サジェッション付きTextBox
ComboBox
PDFSharp の FontResolver
OpenCvSharp4 の RotatedRect の Angle で得られる角度について
MailKitを使って受信するときの文字化け
WPFの画面で繰り返しを作る
サジェッション付きTextBox
PCの操作に慣れている人でも、ここに得意先コードを入れてEnterキーを押してくださいとか、
DataGridに一覧を表示しておいて、選択してくださいとか言いにくい状況がやってきたときに、
サジェッション付きTextBoxなら良いかと思ってつくったもの
ユーザーコントロールにするにはxamlが複雑すぎて、プログラムの中で使ったそのまま
こちらのサイトを参考にさせていただきました。
WPF Auto Complete/Suggestion Text Box Control
        <StackPanel  HorizontalAlignment="Left" Margin="139,92,0,0" VerticalAlignment="Top">
            <TextBox x:Name="tokuimei" TextWrapping="Wrap" Text="" Width="350" TextChanged="Tokuimei_TextChanged" PreviewKeyDown="Tokuimei_OnPreviewKeyDown">
                <TextBox.InputBindings>
                    <!-- Window1は使用環境に合わせて変更してください-->
                    <KeyBinding Key="Enter" Command="{x:Static local:Window1.TokuimeiIn}" />
                </TextBox.InputBindings>
            <TextBox>
            <Popup x:Name="tokuimeiListPopup" Visibility="Collapsed" StaysOpen="False" Placement="Bottom">
                <ListBox x:Name="tokuimeiList" Visibility="Collapsed"  SelectionChanged="TokuimeiList_SelectionChanged" ItemsSource="{Binding}">
                    <ListBox.ItemTemplate>
                        <DataTemplate>
                            <StackPanel Orientation="Horizontal">
                                <!-- TOKUINO, TOKUIMEI, Width, Margin は使用環境に合わせて変更してください-->
                                <TextBlock Text="{Binding TOKUINO}" Width="50" Margin="10" />
                                <TextBlock Text="{Binding TOKUIMEI}" Margin="10" />
                            </StackPanel>
                        </DataTemplate>
                    </ListBox.ItemTemplate>
                    <ListBox.ItemContainerStyle>
                        <Style TargetType="ListBoxItem">
                            <Setter Property="BorderBrush" Value="LightBlue"></Setter>
                        </Style>
                    </ListBox.ItemContainerStyle>
                </ListBox>
            </Popup>
        </StackPanel>
        // このクラスの最初のほうに
                        :
        List<Tokui> tokuimeiSuggestionList = new List<Tokui>();
        public Tokui? SelectedTokui = null;
                        :
        // InitializeComponent();のあとで
                        :
            CommandBindings.Add(new CommandBinding(TokuimeiIn, TokuimeiInExec));
                        :
        // Loaded か ContentRendaed でデータベースより表示用データを読む。、Tokuis と TOKUINO の所は変更してください
                        :
        tokuimeiSuggestionList = dbContext.Tokuis.OrderBy(x => x.TOKUINO).ToList();
                        :
                        :
        // 処理コードの部分
                        :
        public static RoutedCommand TokuimeiIn = new RoutedCommand();
                        :
        private void OpenTokuimeiSuggestionBox()
        {
            try
            {
                // Enable.
                tokuimeiListPopup.Visibility = Visibility.Visible;
                tokuimeiListPopup.IsOpen = true;
                tokuimeiList.Visibility = Visibility.Visible;
            }
            catch (Exception ex)
            {
                // Info.
                MessageBox.Show(ex.Message, "Error", MessageBoxButton.OK, MessageBoxImage.Error);
                Console.Write(ex);
            }
        }

        public void CloseTokuimeiSuggestionBox()
        {
            try
            {
                // Enable.
                tokuimeiListPopup.Visibility = Visibility.Collapsed;
                tokuimeiListPopup.IsOpen = false;
                tokuimeiList.Visibility = Visibility.Collapsed;
            }
            catch (Exception ex)
            {
                // Info.
                MessageBox.Show(ex.Message, "Error", MessageBoxButton.OK, MessageBoxImage.Error);
                Console.Write(ex);
            }
        }

        private void Tokuimei_TextChanged(object sender, TextChangedEventArgs e)
        {
            try
            {
                // Verification.
                if (string.IsNullOrEmpty(tokuimei.Text))
                {
                    // Disable.
                    this.CloseTokuimeiSuggestionBox();
                    SelectedTokui = null;

                    // Info.
                    return;
                }

                // Settings.
                // TOKUIMEI の所は変更してください
                var itemSourceList = tokuimeiSuggestionList.Where(x => x.TOKUIMEI != null && x.TOKUIMEI.Contains(tokuimei.Text, StringComparison.CurrentCultureIgnoreCase)).ToList();
                if (itemSourceList.Count > 0)
                {
                    tokuimeiList.ItemsSource = itemSourceList;

                    // Enable.
                    this.OpenTokuimeiSuggestionBox();
                }
                else
                {
                    // Disable.
                    this.CloseTokuimeiSuggestionBox();
                    SelectedTokui = null;
                }
            }
            catch (Exception ex)
            {
                // Info.
                MessageBox.Show(ex.Message, "Error", MessageBoxButton.OK, MessageBoxImage.Error);
                Console.Write(ex);
            }
        }

        private void TokuimeiList_SelectionChanged(object sender, SelectionChangedEventArgs e)
        {
            try
            {
                // Verification.
                if (tokuimeiList.SelectedIndex <= -1)
                {
                    // Disable.
                    this.CloseTokuimeiSuggestionBox();

                    // Info.
                    return;
                }

                // Disable.
                this.CloseTokuimeiSuggestionBox();

                // Settings.
                // Tokui の所は変更してください
                SelectedTokui = ((Tokui)tokuimeiList.SelectedItem);
                // ここで選択されたデータを表示します(この例では、郵便番号や住所など。tokuimei 以外の表示項目は必要に応じて作成します)
                tokuimei.Text = SelectedTokui.TOKUIMEI;
                yubinno.Text = SelectedTokui.YUBINNO;
                jyusyo1.Text = SelectedTokui.JYUSYO1;
                jyusyo2.Text = SelectedTokui.JYUSYO2;
                telno.Text = SelectedTokui.TELNO;
                faxno.Text = SelectedTokui.FAXNO;
                tokuimeiList.SelectedIndex = -1;
            }
            catch (Exception ex)
            {
                // Info.
                MessageBox.Show(ex.Message, "Error", MessageBoxButton.OK, MessageBoxImage.Error);
                Console.Write(ex);
            }
        }

        private void Tokuimei_OnPreviewKeyDown(object sender, KeyEventArgs e)
        {
            if (e.Key == Key.Enter)
            {
                this.CloseTokuimeiSuggestionBox();
            }
        }

        private void TokuimeiInExec(object sender, ExecutedRoutedEventArgs e)
        {
            // ここに tokuimei の所に入力されて Enter を押された場合の処理を書きます
                    :
        }
上へ戻る
ComboBox
CombpoBox で IsEditable=true とした場合、
SelectionChanged イベントが最初の1文字を入力した直後に発生します
SelectedIndex が -1 かチェックすれば回避できると思いますが、 上のサジェッション付きTextBox を少し改造して作ったもの
必要な時だけPopUpListを表示したい場合(例えば郵便番号を入れて住所が表示されるとかの、キーが時々重複していてその時だけ PopUpList から選択させたい)
などにも少しの改造で使えます
(PopupList を表示させるボタンの削除と TextBox を囲っている内側の StackPanel の定義(2,3行目)を削除して、プログラムで PopupList を表示させるなど)
        <StackPanel  HorizontalAlignment="Left" Margin="148,53,0,0" VerticalAlignment="Top">
            <Border BorderThickness="1"  BorderBrush="#FFABADB3" Grid.Column="1" Grid.Row="1">
                <StackPanel Orientation="Horizontal">
                      <TextBox x:Name="textInputBox1" TextWrapping="Wrap" Text="" Width="180" Height="23" VerticalContentAlignment="Center" BorderThickness="0">
                        <TextBox.InputBindings>
                            <!-- Window1 は使用環境に合わせて変更してください-->
                            <KeyBinding Key="Enter" Command="{x:Static local:Window1.textInputBox1In}" />
                        </TextBox.InputBindings>
                     </TextBox>
                    <Button Width="14" Background="White" BorderThickness="0" Click="OpenPopUpListBox">
                        <Button.Content >
                            <TextBlock Text="⌄">
                            <TextBlock.RenderTransform>
                                    <ScaleTransform ScaleX="1.0" ScaleY="0.8"/>
                                </TextBlock.RenderTransform>
                            </TextBlock>
                        </Button.Content>
                    </Button>
                </StackPanel>
            </Border>
            <Popup x:Name="pouupListPopup" Visibility="Collapsed" StaysOpen="False" Placement="Bottom">
                <ListBox x:Name="popuoList" Visibility="Collapsed"  SelectionChanged="popUpList_SelectionChanged" ItemsSource="{Binding}">
                    <ListBox.ItemTemplate>
                        <DataTemplate>
                            <StackPanel Orientation="Horizontal">
                                <!-- KUBUNMEI は使用環境に合わせて変更してください-->
                                <TextBlock Text="{Binding KUBUNMEI}" Width="180" Margin="4" />
                            </StackPanel>
                        </DataTemplate>
                    </ListBox.ItemTemplate>
                    <ListBox.ItemContainerStyle>
                        <Style TargetType="ListBoxItem">
                            <Setter Property="BorderBrush" Value="LightBlue"></Setter>
                        </Style>
                    </ListBox.ItemContainerStyle>
                </ListBox>
            </Popup>
        </StackPanel>
        // InitializeComponent();のあとで
                        :
        CommandBindings.Add(new CommandBinding(textInputBox1In, textInputBox1InExec));
                        :
        // Loaded か ContentRendaed でデータベースより表示用データを読む。Kubuns と KUBUNMEI の所は変更してください
                        :
        kubuns = dbContext.Kubuns.OrderBy(x => x.KUBUNMEI).ToList();
        popUpList.ItemsSource = kubuns;
                        :
                        :
        // 処理コードの部分
                        :
        public static RoutedCommand textInputBox1In = new RoutedCommand();
                        :
        private void OpenPopUpListBox(object sender, RoutedEventArgs e)
        {
            try
            {
                // Enable.
                popUpListPopup.Visibility = Visibility.Visible;
                popUpListPopup.IsOpen = true;
                popUpList.Visibility = Visibility.Visible;
            }
            catch (Exception ex)
            {
                // Info.
                MessageBox.Show(ex.Message, "Error", MessageBoxButton.OK, MessageBoxImage.Error);
                Console.Write(ex);
            }
        }

        private void ClosepopUpListBox()
        {
            try
            {
                // Enable.
                popUpListPopup.Visibility = Visibility.Collapsed;
                popUpListPopup.IsOpen = false;
                popUpList.Visibility = Visibility.Collapsed;
            }
            catch (Exception ex)
            {
                // Info.
                MessageBox.Show(ex.Message, "Error", MessageBoxButton.OK, MessageBoxImage.Error);
                Console.Write(ex);
            }
        }

        private void popUpList_SelectionChanged(object sender, SelectionChangedEventArgs e)
        {
            try
            {
                // Verification.
                if (popUpList.SelectedIndex <= -1)
                {
                    // Disable.
                    this.ClosepopUpListBox();

                    // Info.
                    return;
                }

                // Disable.
                this.ClosepopUpListBox();

                // Settings.
                var selectedKakoKubno = ((Kubun)popUpList.SelectedItem);
                textInputBox1.Text = selectedKakoKubno.KUBUNMEI;
                popUpList.SelectedIndex = -1;
            }
            catch (Exception ex)
            {
                // Info.
                MessageBox.Show(ex.Message, "Error", MessageBoxButton.OK, MessageBoxImage.Error);
                Console.Write(ex);
            }
            // ここに popUpKist が選択された後の処理を書きます
                        :
        }

        private void textInputBox1InExec(object sender, ExecutedRoutedEventArgs e)
        {
            // ここに textInputBox1 の所に入力されて Enter を押された場合の処理を書きます
                        :
        }
上へ戻る
PDFSharp の FontResolver
PDF の文書を作成するために、PDFsharp を使いました
nuget サイトによると、最新バージョンは 6.1.1 で .NET6.0 に対応しているとのことですが、.NET8 でも使えました(文字出力とbmp画像の張り付けだけしか試していません)
次のバージョン 6.2.0 は .NET8 に正式対応するようです
日本語を使用するのは FontResolver を用意しなければいけないのですが、いろいろ試して Arial 以外のフォントは FontResolver の記述が必要のようです
使えるフォントは ttf と otf で、windows に最初からインストールしてある 「游明朝」が日本語として使用可能です
以下のサンプルでは、游明朝 と Courier(Courier new) が使用できます
Notoフォントをインストールして使用した場合は、出力されるファイルにフォントが埋め込まれるため、1フォントあたり 10~20MB程出力ファイルが大きくなります
                        :
                // プログラムの中で PDF を作成する部分
                // 新しいドキュメントを作る前に FontResolver を登録する
                PdfSharp.Fonts.GlobalFontSettings.FontResolver = new JapaneseFontResolver();
                PdfDocument document = new PdfDocument();
                        :
                        :
                // フォント指定の部分
                // フォント名は FontResolverInfo の case 文で指定したものと同じ名前を使う
                XFont font = new XFont("游明朝", 10, XFontStyleEx.Regular);
                        :
                        :


    // 日本語を使うための FontResolver
    //
    public class JapaneseFontResolver : IFontResolver
    {
        public byte[]? GetFont(string faceName)
        {
            // Windowsのフォントフォルダーを指定する
            string? variable = System.Environment.GetEnvironmentVariable("windir");
            string fontPath = System.IO.Path.Combine(variable ?? "", "Fonts", faceName);
            if (File.Exists(fontPath) == false)
            {
                // ユーザーのフォントフォルダーを指定する
                variable = System.Environment.GetEnvironmentVariable("USERPROFILE");
                fontPath = System.IO.Path.Combine(variable ?? "", @"AppData\Local\Microsoft\Windows\Fonts", faceName);
            }
            try
            {
                using (var fontStream = File.OpenRead(fontPath))
                {
                    var fontData = new byte[fontStream.Length];
                    fontStream.Read(fontData, 0, fontData.Length);
                    return fontData;
                }
            }
            catch
            {
                Console.WriteLine("フォントファイルを開けませんでした。");
                return null;
            }
        }

        public FontResolverInfo? ResolveTypeface(string fontName, bool isBold, bool isItalic)
        {
            switch (fontName)
            {
                // caseでのフォント名はフォント指定時とここで使うだけなので、適当につけて良い
                // returnでフォントのファイル名を返す
                case "游明朝":
                    if (isBold)
                    {
                        return new FontResolverInfo("Yumindb.ttf");
                    }
                    else if (isItalic)
                    {
                        return new FontResolverInfo("Yuminl.ttf");
                    }
                    else
                    {
                        return new FontResolverInfo("Yumin.ttf");
                    }
                case "Courier":
                    if (isBold && isItalic)
                    {
                        return new FontResolverInfo("courbi.ttf");
                    }
                    if (isBold)
                    {
                        return new FontResolverInfo("courbd.ttf");
                    }
                    else if (isItalic)
                    {
                        return new FontResolverInfo("couri.ttf");
                    }
                    else
                    {
                        return new FontResolverInfo("cour.ttf");
                    }
            }
            // デフォルトのフォント
            return PlatformFontResolver.ResolveTypeface("Arial", isBold, isItalic);
        }
    }
上へ戻る
OpenCvSharp4 の RotatedRect の Angle で得られる角度について
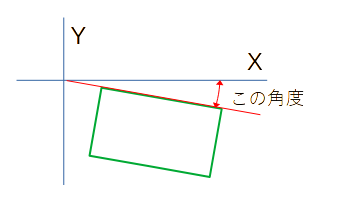
PCに接続したカメラを使って、伝票を取り込んでPDFにするプログラムを作成しました
RotatedRect.Angle で傾きを求めて、Cv2.WarpAffine で傾き補正を行ったのですが、得られる角度が下の図のようになっていました
RotatedRect が右に傾いていた時
RotatedRect が左に傾いていた時
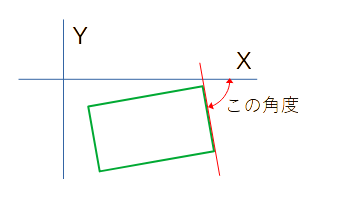
左右の傾きで異なる辺の角度が得られるので Cv2.GetRotationMatrix2D に与える角度に、
得られた角度が45度以上の場合は「角度 - 90.0」として使用しました
上へ戻る
MailKitを使って受信するときの文字化け
MailKitを使ってメールを受信して、subjectや添付ファイルのファイル名が文字化けしてしまった
MailKitの内部で Encoding.GetEncoding を使用しているので、.NET を使っている場合は
Encoding.RegisterProvider(CodePagesEncodingProvider.Instance);
が必要です。
上へ戻る
WPFの画面で繰り返しを作る
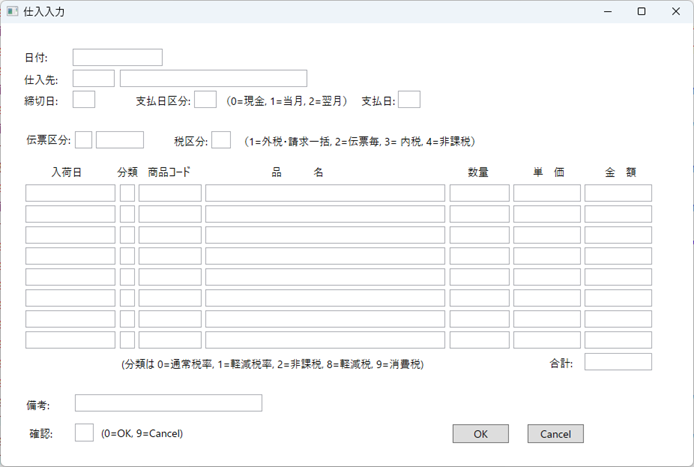
こういう画面を作って、マウスを使わずにテンキーと少しのキーボード入力でデータ入力を行いたい場合で、
画面定義でも楽をしたいと思い作ってみました
WPFの画面定義の一部に繰り返し同じ項目が並ぶ部分があるので、ItemsControlで1行分だけ定義して指定した行数分繰り返す
ItemsControlを使ってデータのやり取りにはObservableCollectionを使う
この例ではユーザーコントロールとして作った日付用TextBox、数値用TextBoxなどを使用しています
ItemsControlと行内の各項目にはFocusで項目移動するので、x:Nameで名前を付ける必要があります
日付を入力するTextBoxは入力無しも許容したいのですが、ValidatesOnExceptions=False ValidatesOnDataErrors=False などでは
エラーチェックを回避できなかったので、TextBox.Styleでエラー表示の赤枠をなくしています
コードのサンプルは大幅に省略していますので、画面とは異なります
                    :
        <!-- 繰り返しの定義部分 -->
        <ItemsControl x:Name="meisais" HorizontalAlignment="Left" VerticalAlignment="Top" Margin="33,215,0,0">
            <ItemsControl.Template>
                <ControlTemplate TargetType="ItemsControl">
                    <StackPanel  Orientation="Vertical">
                        <ItemsPresenter/>
                    </StackPanel>
                </ControlTemplate>
            </ItemsControl.Template>
            <ItemsControl.ItemTemplate>
                <DataTemplate>
                    <StackPanel Orientation="Horizontal">
                        <local:DateTextBox x:Name="nyukabi" Height="23" Margin="0,0,0,5" TextWrapping="Wrap" Text="{Binding Nyukabi, StringFormat=yyyy年MM月dd日}" Width="120">
                            <TextBox.Style>
                                <Style TargetType="TextBox">
                                    <Setter Property="Validation.ErrorTemplate">
                                        <Setter.Value>
                                            <ControlTemplate />
                                        </Setter.Value>
                                    </Setter>
                                </Style>
                            </TextBox.Style>
                            <local:DateTextBox.InputBindings>
                                <KeyBinding Key="Enter" Command="{x:Static local:Window1.NyukabiIn}" />
                            </local:DateTextBox.InputBindings>
                        </local:DateTextBox>
                        <local:NumericTextBox x:Name="bunruiNo" Height="23" Margin="5,0,0,5" TextWrapping="Wrap" Text="{Binding BunruiNo}" Width="20">
                            <local:NumericTextBox.InputBindings>
                                <KeyBinding Key="Enter" Command="{x:Static local:Window1.BunruiNoIn}"/>
                            </local:NumericTextBox.InputBindings>
                        </local:NumericTextBox>
                                :
                        <local:ETextBox x:Name="hinmei" Height="23" Margin="5,0,0,5" TextWrapping="Wrap" Text="{Binding Hinmei}" Width="320">
                            <local:ETextBox.InputBindings>
                                <KeyBinding Key="Enter" Command="{x:Static local:Window1.HinmeiIn}"/>
                            </local:ETextBox.InputBindings>
                        </local:ETextBox>
                                :
                        <!-- 他の項目定義して1行分を完成させる -->
                                :
                    </StackPanel>
                </DataTemplate>
            </ItemsControl.ItemTemplate>
        </ItemsControl>
                :
        // ObservableCollectionの定義
        public ObservableCollection<Meisai> Meisais = new ObservableCollection<Meisai>();
        // 繰り返し部分のデータを格納するクラスの定義
        // この部分の記述内容はC#14(.NET10)でもう少し簡単に記述できるようになるそうです
        public class Meisai : INotifyPropertyChanged
        {
            // 内部保存用項目
            private DateTime? nyukabi;
            private int? bunruino;
            private string? hinmei;
            // 以降すべての項目を定義してください
                    :

            // 外部とのインターフェース
            // setの部分に変更通知を書く
            public DateTime? Nyukabi
            {
                get => nyukabi;
                set { nyukabi = value; OnPropertyChanged(); }
            }
            public int? Bunruino
            {
                get => bunruino;
                set { bunruino = value; OnPropertyChanged(); }
            }
            public string? Hinmei
            {
                get => hinmei;
                set { hinmei = value; OnPropertyChanged(); }
            }
            // 以降すべての項目について定義する
                        :

            public Decimal? SonotaKoumoku { get; set; } // このように画面表示と関係ない項目を作ってもOK

            // データが変更されたら、画面へ変更を通知する
            public event PropertyChangedEventHandler? PropertyChanged;
            protected void OnPropertyChanged([CallerMemberName] string? propertyName = null)
            {
                PropertyChanged?.Invoke(this, new PropertyChangedEventArgs(propertyName));
            }
        }

        // プログラムが作りやすいように、メソッドを3つ定義する
        // UnFocus TextBoxからObservableCollectionへデータを書き込む
        // Focus 指定した項目にFocusを移す
        // GetIndex 指定した項目が何行目にあるか、行(インデックス)を得る
        public void UnFocus()
        {
            // Focusを外すことでTextBoxの値をDataConextに渡すために使用する
            if (Keyboard.FocusedElement is DependencyObject focusedElement)
            {
                FocusManager.SetFocusedElement(FocusManager.GetFocusScope(focusedElement), null);
            }
            Focus();
        }

        public void Focus(ItemsControl items, int index, string name)
        {
            // 任意の行のControl(TextBoxなど)にFocusする
            ContentPresenter? container = items.ItemContainerGenerator.ContainerFromIndex(index) as ContentPresenter;
            if (container != null)
            {
                // control(TextBoxなど)の親クラスControlを使ってFocusする
                Control? control = container.ContentTemplate.FindName(name, container) as Control;
                if (control != null)
                {
                    control.Focus();
                }
                else
                {
                    MessageBox.Show("Controlが見つかりません");
                }
            }
        }

        public int GetIndex(ItemsControl items, object control)
        {
            // TextBoxなどはControlを継承しているので、controlの型はControlでも良いのですが、ここでcontrolがobject型になっているのは
            // ItemsControlにマウスクリックなどのイベントを追加して使用した場合に、これを受け取るのがTextBoxではなくその内部のTextBoxViewなので
            // e.OriginalSourceでTextBoxViewを取得してこのメソッドに渡した場合、Control型に変換できないためです
            DependencyObject? container = items.ItemContainerGenerator.ContainerFromItem(control.GetType().GetProperty("DataContext")?.GetValue(control));
            if (container != null)
            {
                return items.ItemContainerGenerator.IndexFromContainer(container);
            }
            else
            {
                MessageBox.Show("Controlが見つかりません");
                return -1;
            }
        }

                    :
        // Windowの初期化後にObservableCollectionを必要な行数分作ってBindする
            for (int i = 0; i < 8; i++)
            {
                Meisais.Add(new Meisai());
            }
            meisais.ItemsSource = Meisais;
                    :

        // Enterキーの入力で処理を行う部分
        // 入荷日の入力後の処理
        private void NyukabiInExec(object sender, ExecutedRoutedEventArgs e)
        {
            UnFocus(); // 最初にUnFocus()で入力内容をObservableCollectionへ反映させる
            int index = GetIndex(meisais, e.OriginalSource); // e.OriginalSourceを指定して入力された項目の行を取得
            // ここで必要な処理を行う

            // 次の項目をFocus
            Focus(meisais, index, "bunruiNo");
        }
        // 分類Noの入力後の処理
        private void BunruiNoInExec(object sender, ExecutedRoutedEventArgs e)
        {
            UnFocus();
            int index = GetIndex(meisais, e.OriginalSource);
            int bunrui = Meisais[index].Bunruino ?? 0; // UnFocus()でObservableCollectionにデータが格納されているので、使用できる
            // ここで必要な処理を行う

            // 次の項目をFocus
            Focus(meisais, index, "hinmei");
        }
        // この後は必要な処理を記述する
                    :
画面上の繰り返し部分のすべての項目を初期化したい場合に
            Meisais.Clear();
            for (int i = 0; i < 8; i++)
            {
                Meisais.Add(new Meisai());
            }
とすれば、プログラムが短く済むのですが
            for (int i = 0; i < Meisais.Count; i++)
            {
                Meisais[i].Nyukabi = null;
                Meisais[i].Bunruino = null;
                Meisais[i].Hinmei = null;
                    :
            }
このように1項目ずつnullで埋めていったほうが、処理時間がかかりません。150項目ほどの画面で試したのですが、下の処理のほうがforループ部分だけで10倍近く速くなり
画面描画を含めると、体感できるほどの差が生じます
UIの作り直し(ObservableCollectionがクリアされたので、繰り返し部分を再描画して新しい項目をBindingする)処理に時間がかかっているものと思われます
また、初期化する部分が離れていると分かりずらいので、データを格納するクラスに初期化用のメソッドを作成してから使用したほうが良いかと思います
            // データを格納するクラスに追加する(メソッド名は何でもよい)
            // 初期化したい項目のみ記述する
            public void Reset()
            {
                Nyukabi = null;
                Bunruino = null;
                Hinmei = null;
                    :
            }


                    :


            // プログラムの中で初期化する部分で
            for (int i = 0; i < Meisais.Count; i++)
            {
                Meisais[i].Reset();
            }